Page 2 of 4
#11 Re: Astro Cam Rehab
Posted: Mon, 23 May 16, 02:04 am
by bernomatic
bernomatic said Feb 13, 2016
Time for a trip to Wally Mart to visit a section I haven't been in for a long while, the infant section.

I found a new fangled version of an old friend.
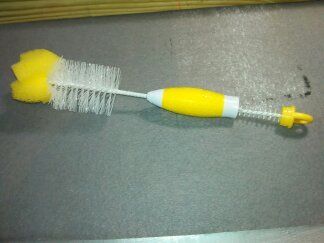
I liked the smaller nipple brush stored in the handle which is just perfect for a BT-5. I'm not so happy with the sponges on the end, but I'm sure they'll disappear after a while and I won't have to worry about unwrapping the wires or pulling them out and loosening half the bristles on the rest of the brush.
#12 Re: Astro Cam Rehab
Posted: Mon, 23 May 16, 02:05 am
by bernomatic
bernomatic said Feb 13, 2016
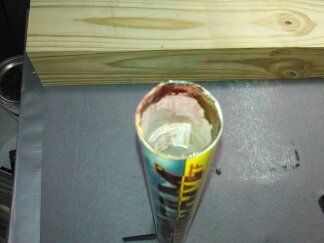
Well the rim started buckling as I scrubbed the insides (no water, I know I don't have to say that, but...) so time for a little Super Glue around the rim.
#13 Re: Astro Cam Rehab
Posted: Mon, 23 May 16, 02:06 am
by bernomatic
bernomatic said Feb 13, 2016
Next straightening the edge by removing about an 1/8th of an inch.

- trimming body tube.jpg (271.97 KiB) Viewed 8105 times
#14 Re: Astro Cam Rehab
Posted: Mon, 23 May 16, 02:20 am
by bernomatic
I revved this thread not just for a trip down memory lane, and not just because I am ready to continue with the repairs, but because the next step is the fin repair which I will be cutting out of styrene. "Huh?

so?" you say. Well the styrene is white and the fin can is black. "yeah so??????" So, in another thread I have been looking at airbrushing with a particularly problematic paint. This will be a good project to test out some new information I found on using that paint, Createx airbrush colors.


#15 Re: Astro Cam Rehab
Posted: Wed, 01 Jun 16, 16:29 pm
by Commander
The project is on hold right now, although I have cut out the fin and prepped it for airbrushing. I purchased a dehumidifier this past Memorial Day and am trying to get the humidity in the basement down below at least 50% before beginning to spray. Yes I do have a moisture trap on the air line, but I think it will be better all around if it's not as damp down there.
#16 Re: Astro Cam Rehab
Posted: Sat, 11 Jun 16, 18:38 pm
by bernomatic

- P6090002.JPG (49.12 KiB) Viewed 8923 times
Here is the fin I cut out of sheet styrene, I added a 4 mm tab to the profile copied from the other fins. The sheet stock was a little too thick, so I sanded and shaped the profile to match the existing fins as best I could.
#17 Re: Astro Cam Rehab
Posted: Sat, 11 Jun 16, 18:46 pm
by bernomatic
Using an angle iron and x-acto knife I scribed a line along the fin can where the original fin had been. Than using the x-acto knife, I kept going over the scribe line till I had cut a slot in the fin can. Using sandpaper I widened the hole till the tab from the fin fit like a glove.

- P6110005.JPG (147.21 KiB) Viewed 8923 times

- P6110010.JPG (78.68 KiB) Viewed 8923 times
#18 Re: Astro Cam Rehab
Posted: Sun, 12 Jun 16, 03:14 am
by luke strawwalker
Nice! OL J R
#19 Re: Astro Cam Rehab
Posted: Tue, 21 Jun 16, 18:32 pm
by bernomatic
I was getting ready to put this one to bed, when last night during one of the coats using the Createx Air Brush Colors, I was curing the paint on the fin can, when one of the other fins which had long ago broken off and was glued back on, fell off.

The heat needed to cure the paint had heated the tube type plastic glue enough to allow the bond to be broken.
Of course gluing it back on is possible, but it has ruined the finish of the paint which was looking pretty good.


#20 Re: Astro Cam Rehab
Posted: Wed, 22 Jun 16, 01:09 am
by bernomatic
I used Rust-oleum filler & primer to prep the fin can

- Astro-Cam fin can priimered.JPG (124.82 KiB) Viewed 8909 times
Then I gave it three coats of the Createx/Future Shine 1:1 mixture. Everything was looking fine, the finish almost a semi-gloss.
I glued the fin back on, but it seems very weak. In this picture, the bad fin is the closer upper fin and the replaced fin is the upper away fin, which I noticed has a slight scratch in it, probably from my handling while replacing the re-broken fin.

- Astro-Can painted fin can.JPG (59.37 KiB) Viewed 8909 times
The game plan at this point is to:
1) lightly buff out the scratch with a Q-tip dipped in alcohol. Sanding is NOT recommended with Createx airbrush colors, even if cured. The alcohol will thin and even "erase" the paint job.
2) Spray the undamaged parts with Rust-oleum Crystal Clear Enamel. They need protecting before more scratches appear.
3) Evaluate the fin for repair or replacement.